 |
| http://curiousphotos.blogspot.com/2009/07/80-funny-food-pictures.html |
wine induced eats.....
Search
Thursday, February 10, 2011
Don't Pay Attention to the Date....
I feel a little like the man behind the curtain in Oz, like I can distract you from noticing how long ago my last post was by waving a big smoke screen in front of your eyes...
Tuesday, October 26, 2010
Fall Soup
Fall is here! We love it!!!!!! Yesterday was a nice big rainstorm and lucky for me, my day off. I got to sit home all day in my cozy house watching the leaves fly by and rain pour down. So, what better after a cozy fall day then a cozy fall dinner?
Dinner
Grilled Cheese Sandwiches
Creamy Butternut Soup
Apple Cider
_______________________________________________________________
1 Medium Onion, chopped
2 Large Gala Apples, chopped
3 Tbs Butter
1 Medium Butternut Squash, peeled and chopped
34oz Chicken Broth
½ Cup Apple Cider
¼ Cup Heavy Cream
Salt and Pepper
- In a 5quart stockpot melt butter over med high heat and sauté onions and apples for 5 mins or until tender.
- Add squash, broth, juice, and ½ tsp salt. Bring to boil, then reduce, cover, and simmer for 30-40 minutes or until squash is tender. Remove from heat.
- Transfer in batches to a food processor and puree until smooth.
- Add heavy cream to the puree. Salt and pepper to taste. Enjoy!
_______________________________________________________________
Thursday, October 21, 2010
Deconstruction of Chicken and Dumplings
 |
| Srsly, how scary is this road?! |
After an, eh hum, “spirited” game night at Tomcans new house last weekend we had a houseguest stay with us. We hung out in pain and watched a marathon of IRT’s new show “Deadliest Roads”. It really worked up an appetite and since he is well under the weight guidelines for my house, I had to fatten him up... with gravy.
Breakunchinner (it’s a thing)
Mom’s Version of Chicken and Dumplings
Salad
Assorted Energy Drinks
_______________________________________________________________
Mom’s Chicken and Dumplings
8 Chicken Thighs or 4 Breasts, skin on with bone
1 Carrot
1 Stalk Celery
1 1/3 Cup Bisquick
3-6 Tbs Milk
1-2 Cans Chicken broth
Salt and Pepper
- Place chicken seasoned with S&P into Dutch Oven (on the stovetop over med+) or skillet with a lid, add chopped up carrots, celery, and a few Tbs of chicken broth. Cook through with cover in place.
- Mix up Bisquick and milk in a bowl until it resembles a cross between dough and batter.
- When chicken is cooked (or within a few minutes of being done), remove cover and place a spoonful or two of the batter mix on top of each piece of chicken. Replace cover. Cook for 10+/- minutes or until toothpick inserted into the “dumpling” comes out clean.
- Remove chicken pieces with dumplings cooked on top from the pan, transfer to plate.
- Now is time for gravy! Use your own recipe, or follow my easy one:
- Mash up the little carrot and celery bits left in the pan with the back of a spoon or something creative.
- Keep the heat going on the pan and pour in 1-2 cans chicken broth (depending on how much gravy you want).
- Scrap the little browned bits from the bottom of the pan and let them “season” your gravy.
- In a little bowl, mix together a few Tbs of flour (or cornstarch) and enough COLD water to make it thinner than a paste. Mix until it is smooth.
- Pour the flour mixture into the gravy SLOWLY while mixing well.
- Let the gravy cook (stir occasionally) until it is thickened and bubbly, reduce heat and let cool a little.
- Season with S&P.
- Place chicken on plate, cover with gravy, ENJOY!
_______________________________________________________________
Friday, October 15, 2010
Lazy Dazy
| Our DR trip, all dressed up and ready for sushi dinner. |
Not just lazy about blogging, but lazy in general. We spent a little over a week in the Dominican Republic, came home to the flu, and ever since then my motivation has been MIA.
This weekend will be different! It is a slow weekend in the Keiffer house, only plans on Saturday. Sunday will be full of
I promise I will blog something after this weekend.
| We survived in DR on ice cream, espresso, Mamajuana, wine, and water. YUM. |
Saturday, September 11, 2010
Saved by Sushi
And this is why I married the guy! Besides his devilish good looks and ability to walk on stilts, this might be one of my favorite things about him: he knows how to win me over with fresh sushi.
My office was slammed today. Lunch is usually my escape, but not today. As soon as I walked into the kitchen I realized I had 5 minutes to rush back. Needless to say, my lunch plans were scraped and I started to hope I could find 15 quiet minutes later in the day to at least scarf down a crusty bagel (gluten free! Udi’s Handcrafted Foods Plain Bagels).
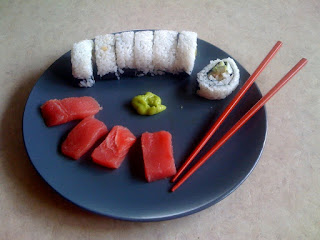
Thankfully a knight in shining armor saved me by delivering a plate of sushi, complete with a side of Diet Coke.
Lunch
- Max’s California-ish Rolls
- Yellow Fin Sashimi
- Diet Coke
_______________________________________________________________
Sushi Rice
Prepared Short Grain Rice, still warm
Sushi Vinegar
Fan
Rice Paddle
Cookie Sheet
Plastic Wrap
Four Hands
- Cover your cookie sheet with plastic wrap (this is awesome for clean up!), then dump your rice onto it.
- Add your sushi vinegar to the pile 1 Tbs at a time then “cut” it in. You don’t want to mix it because it will lose the consistency you want; instead you slice into it with your rice paddle repeatedly until it is thoroughly mixed in.
- While you are cutting in the vinegar you need your other hand (or a borrowed hand) fanning the rice to cool it. The longer you take to cool it, the drier your rice will turn out.
- Keep adding the vinegar until you get the taste you are looking for, no amount is a wrong amount.
- When you are ready to roll sushi be sure to only handle the rice with wet hands, that way the rice won’t stick to your fingers.
_______________________________________________________________
Friday, September 10, 2010
Happiness is a Good Pasta Sauce
Our garden is slow going this year. With the colder than normal temperatures in the NW we have had lame fruit and veggies that take fooorrrever to ripen. Luckily we planted 12 tomato plants and hung up a “Topsy Turvey”. Still, the fruits of our labor (ha) are barely enough to cover dinner each night.
If you ever asked me what my favorite food was, I would automatically give you my Creamy Tomato sauce recipe. Perfect over salty Chicken Parmesan on a bed of (gluten free!) noodles, yum. The sauce is light, sweet, tangy, and just rich enough. I am drooling thinking about it!
Dinner
- Chicken Parmesan
- Ancient Harvest Gluten Free Spaghetti (the best!)
- Loads of Creamy Tomato Sauce
- Naked Wineries Vixen Syrah
Seriously, still drooling over here, it is almost embarrassing at this point.
__________________________________________
Creamy Tomato Sauce
3-4 Cups Tomatoes, use fresh and a variety of Cherry, Plum , and Romas, skins removed.
3-4 Cloves Garlic chopped (I like garlic a lot)
1 Shallot chopped
2 Tbs Butter
¼ Cup Heavy Cream
¼ Cup Shredded Parmesan (or more, to taste)
Salt
.jpg) |
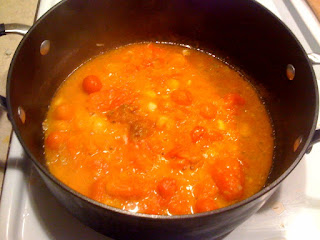
| Step #2, Half Way Through |
- Place butter, onions, and garlic over med heat. Sautee until translucent and soft.
- Add tomatoes to the mixture bring to a high simmer then turn down heat to a low simmer. Cook until most of the tomatoes break apart and are soft. About 15-25 minutes.
- Add the cream, stirring frequently over medium heat for around 5 minutes, or until it starts to thicken.
- Turn off heat on the burner and add the Parmesan, stirring constantly until melted.
- I don’t add salt; this is a perfect taste to me on its own. But if it is too sweet for you, this is where you would add a pinch of salt.
- Serve immediately or the cheese will clump and separate.
The wine? Adorable bottle, cute slogans, all in all a nice package! The wine itself wasn't half bad, but for $20+ a bottle? Could have been better.
Thursday, September 9, 2010
Pierogis-A-Go-Go
We have a local restaurant in town that has great food and I used to waitress at. Some of the best memories I have of working there were coming home after a horribly long dinner shift with a huge bag of food (half off dinners!) that we would spread out on the coffee table and feast on. One of our favorite things to get was the pierogies. Pastas stuffed with potatoes and cheese, covered in bacon and sautéed onions, and dipped in sour cream? Yum.
We both were craving comfort food the other night and you guessed it, this is what we wanted. So, we learned how to make a pierogi.
Comfort Snack
§ Pierogies
§ Whatever-was-left-in-the-cooler-mish-mash-beer
We ended up with too many to eat so we froze them to eat later.
____________________________________
Pierogies
3 Cups Flour (for the gluten free variation use my flour mix)
¼ Cup Olive Oil
1 Cup Water
1 Tsp Salt
2 Cups Prepared Mashed Potatoes
1 Cup Grated Cheese
Butter for browning
Red Onion, sliced
6 Strips Cooked Bacon
Sour Cream
- Mix together flour, water, and olive oil in a bowl or mixer (you can mix with your dough hook on med for 1 minute) until well blended. Turn onto a floured surface and knead for 3-5 minutes, or until a good elastic consistency. Cover with plastic wrap and place in the fridge for 30.
- Roll out the dough on a floured surface until 1/8 inch thick. Use the mouth of a glass or a cookie cutter to cut out circles from the dough.
- Mix together potatoes and cheese. Make a 1 inch ball from the mixture and place in the middle of one of the dough circles. Fold the dough circle over and pinch the edges to “seal” the potato mixture inside. Repeat for all the other pierogies.
- Drop pierogies a few at a time into a pot of boiling water, be sure to not crowd them. Let boil 7-10 minutes or until they are all floating and appear done. Remove from water, drain, rinse with cold water, and lay out to dry for 15-20 minutes, turning once.
- Heat butter in a skillet over med-high heat and place onion slices and dried piergoies in the pan. “brown” each side for 2-4 minutes and then flip when golden and starting to crisp. Drain.
- Serve with crumbled bacon over the top and dipped in sour cream.
.jpg)
_______________________________
Subscribe to:
Posts (Atom)

.jpg)